


Content:
- List of main abbreviations
- Connection and configuration
- Step 1. Set up access permissions
- Step 2. Enable medical accounting in 1C
- Step 3. Configure the data of your clinic (MO)
- Step 4. Set up communication with EGISZ via Medflex
- Step 5. Set up folders for storing documents (RAMD Archive)
- Step 6. Configure the updating of reference books (EGISZ classifiers)
- Step 7. Fill in the information about the doctors (Medical staff)
- Step 8. Adding an electronic signature and encryption program
- Step 9. Installing and linking EDS to doctors
- Step 10. Configure patient data
- Step 11. Set up Medical Document Templates (EMDS)
Instructions for self-installation and updating of Medflex extensions for 1C
List of main abbreviations 
- EGISZ: unified State health information system (state database).
- REMD: the register of electronic medical documents (part of the EGISZ, where documents are stored).
- MO: your Medical Organization (clinic).
- FRMO: the federal register of medical organizations (a list of all clinics in the EGISZ).
- FRMR: the federal register of medical workers (a list of all doctors in the EGISZ).
- MIS: Medical Information System (this is your 1C program).
- EDS: an electronic digital signature (as an electronic seal for documents).
There are 2 types:- Technical EDS of the Ministry of Defense: Signs requests on behalf of the entire clinic to the EGISZ.
- Doctor's EDS: Signs specific medical documents (conclusions, protocols).
- Organization's OID: the unique number of your clinic in the FRMO registry.
- IPS: an integration subsystem (part of the EGISZ system for data exchange).
- LPU uid (LPU Uid): The unique number of your clinic in the Medflex system (the technical intermediary for communication with EGISZ).
- Token: a special electronic key (password) for accessing EGISZ services via Medflex.
- SAMD: a structured Electronic Medical Document (a special document format for EGISZ).
Connection and configuration
Video Tutorial
Purpose: To set up your MIS for the exchange of electronic medical documents with the state EGISZ system.
It is important to know before starting:
- Work carefully. Incorrect settings may prevent documents from being sent.
- Save the data that you enter: tokens, addresses, and IDs. You'll need them later.
- For some steps, you will need data from MedRoket. Prepare them in advance.
- Make sure that you have the latest version of the 1C program installed (step 1).
Step 1. Set up access permissions
Users who will work with the EGISZ functions will need a special role «MR_ЕГИСЗ»to access them.
To assign a role:
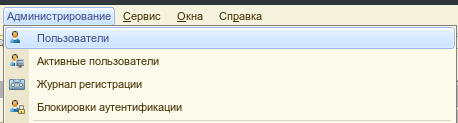
1) In the configurator, open «Администрирование»→ «Пользователи».
2) In the list that opens, find the required user and click on it 2 times.
3) Open the tab«Прочие».
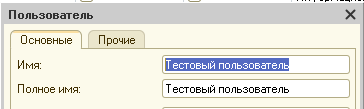
4) Find the available roles in the list «MR_ЕГИСЗ»and check the box next to it.
5) (For outdated configuration versions) If access errors occur when working with the Unified State Register of Legal Entities, then you also need to set the role «Врач»either«Администратор регистратуры».
Step 2. Enable medical accounting in 1C
Video Tutorial
Why: So that the program can work with electronic medical documents for the USISZ.
What to do:
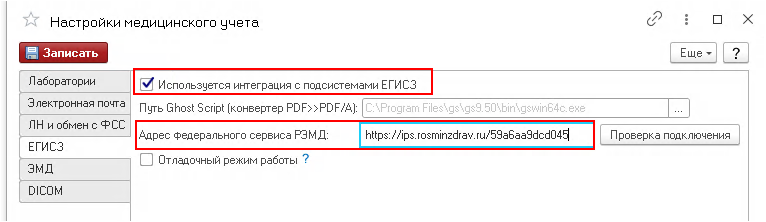
1) Turn on the EGISZ subsystem in the program settings. To do this, go to «Администрирование»→ «Настройки медицинского учёта».
2) In the settings of the EGISZ subsystem, select from the list«Адрес федерального сервиса РЭМД».
Step 3. Configure the data of your clinic (MO)
Video Tutorial
Why: The EGISZ should know who is sending the documents.
What to do:
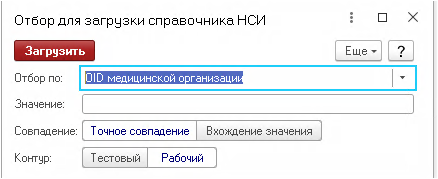
1) Open the directory«Реестр медицинских организаций».
2) Press the button «Загрузить справочник»and find your clinic in the FRMO list (as in the phone book). The data will be uploaded automatically.
3) Check and fill in the Branches in the directory:
- Telephone
- Address
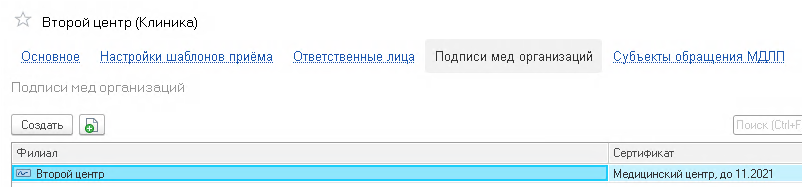
4) Add your clinic's technical EDS to the section«Подписи мед организаций».
- Specify which organization and which 1C user this signature is linked to.
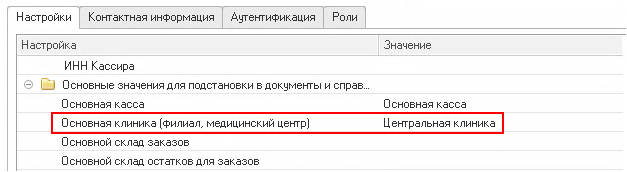
- The user must be associated with a specific employee, and he must have a selected «основная клиника».

5) (If necessary) Upload your divisions from the FRMO to the directory«Структура Подразделений».
Step 4. Set up communication with EGISZ via Medflex
Video Tutorial
Why: Configure «мост»between your 1C program and the USISZ state system. Medflex is a technical intermediary.
What to do:
1) Go to «Интеграция с ЕГИСЗ».
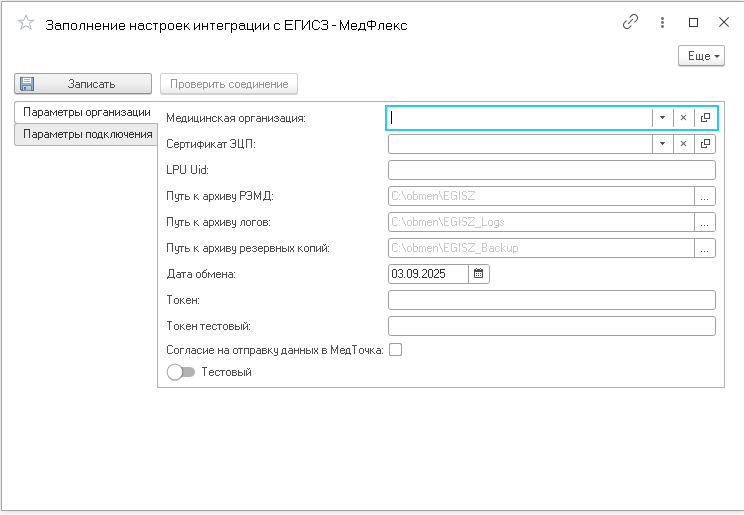
2) Open «Заполнение настроек интеграции с ЕГИСЗ - МедФлекс»it.
3) Select your organization from the directory (as in step 3).
4) Select the EDS certificate (the technical signature of the Ministry of Defense added in step 3).
5) (If necessary) If you are updating from older versions of the Medflex extension, where the path to the RAMD archive was specified in one field«Путь к архиву», then the same path must be specified in the field«Путь к архиву РЭМД». The other 2 fields of the paths should differ in accordance with the recommendations of the developers of the Bit UMTS.
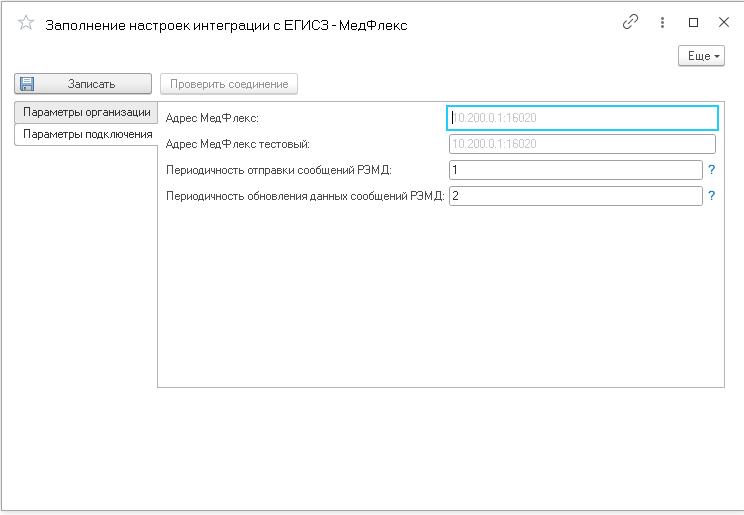
6) Fill in the remaining fields with the data received from MedRoket:
Step 5. Set up folders for storing documents (RAMD Archive)
Why: Documents are temporarily stored here before being sent to the EGISZ and after being received from it. Documents can take up a lot of space.
What is important:
- Use the same folders as specified in Step 4.
- Make sure that the 1C program (especially if it is running on a server) has access to these folders at all times.
- Make regular backups of these folders. It is better to keep copies on another disk or computer.
- Protect these folders from viruses (especially cryptographers).
Important! It is the file that is signed, so you cannot manually bypass the program to replace the file in the directory after signing.
Step 6. Configure the updating of reference books (EGISZ classifiers)
Video Tutorial
Why: The government uses standard lists (reference books) for diagnoses, services, positions, and others. Your program should know them.
What to do:
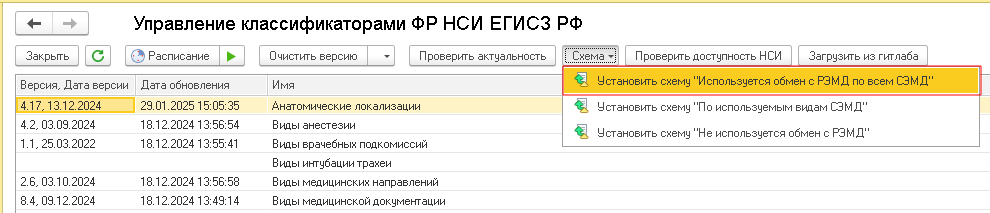
1) Open «Интеграция ЕГИСЗ»→ «Классификаторы ФР НСИ ЕГИСЗ».
2) On the top panel, click «Схема»next«Установить схему»«Используется обмен с РЭМД по всем СЭМД»
3) Set up the directory update mode:
- Full: Download the entire list automatically, which is convenient for small reference books.
- Uploaded only: update only those items that you added manually yourself — for very large directories, for example, the Registry of all clinics in Russia.
- Disabled: do not update — for unnecessary directories.
4) To work with RAMD, enable the update scheme«Используется обмен с РЭМД со всем СЭМД».
5) Click «Запустить обновление« или настройте «Автоматическое обновление по расписанию».
Step 7. Fill in the information about the doctors (Medical staff)
Video Tutorial
Why: Doctors must be registered in the state Register (FRMR) in order to sign documents in the EGISZ of their EDS.
What to do for each doctor:
1) Go to the section «Персонал и зарплата».
2) Open the directory«Сотрудники».
3) Fill in the information from the required doctor:
- Full name (as in the passport)
- Date of birth (as in the passport)
- Department (where the doctor works)
- SNILS (required!)
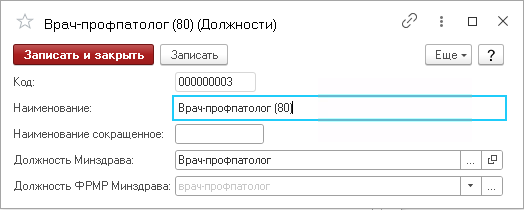
4) In the tab«Должности», set up the position of the doctor:
- Click... next to the Position field.
- Create or select a position (for example, "General Practitioner").
- Open the selected position using the button
- Click... next to the Position of the Ministry of Health / the Position of the FRMR of the Ministry of Health.
- If the list is empty, click Download Directory.
- Find and select the exact job title from the government directory.
5) Link the doctor's EDS to his profile in 1C:
- Go to Administration -> EDS Settings.
- In the tab«Сертификаты», find the doctor's EDS certificate.
- Open it by double-clicking or using the context menu button«Изменить».
- In the User field, select the full name of this doctor.
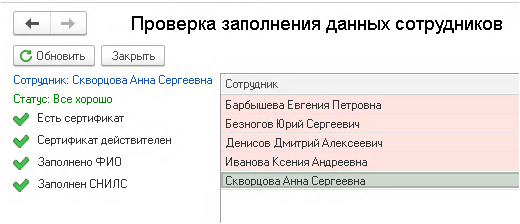
6) Check the correctness of the doctors' data.
In«Пульте контролёра ЕГИСЗ», run the function«Проверка сотрудников на корректность для СЭМД». The system will check the full name, SNILS, position and EDS. Do the check daily and after adding new doctors to the database.
Step 8. Adding an electronic signature and encryption program
Why: So that doctors can sign documents inside the program.
What to do:
For initial setup, you will need a regular PC with the Crypto-Pro program installed.
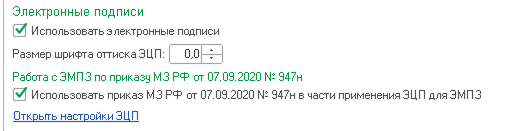
1) «Администрирование» → «Учетная политика» → section «Прочее», check the boxes next «Использовать электронные подписи»to and «Использовать приказ МЗ РФ...».
2) «Администрирование»go to«Настройки ЭЦП»
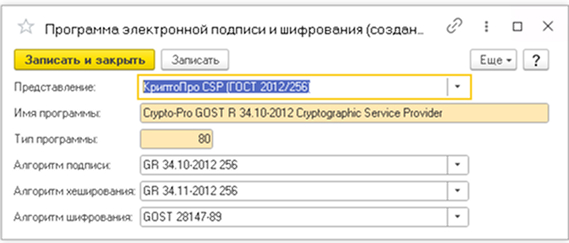
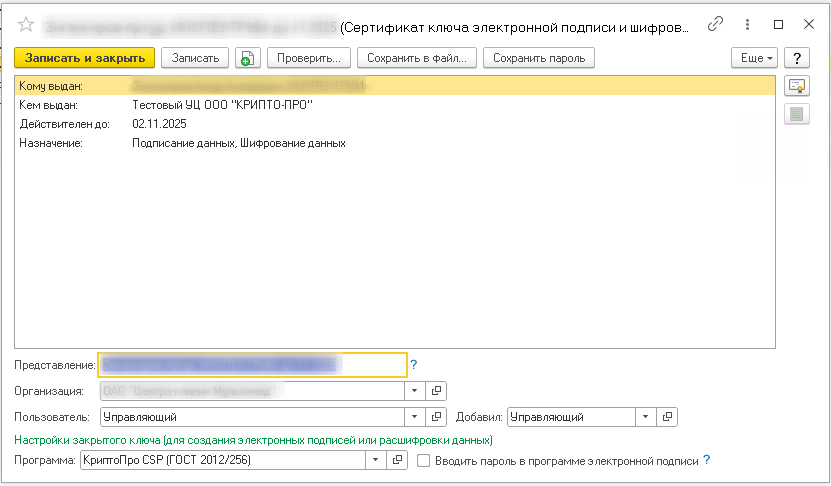
3) In the section, «Программы»click the button «Добавить»in the list that appears, select CryptoPro CSP (GOST 2012/256) as shown in the figure below.
Step 9. Installing and linking EDS to doctors
After you have added the electronic signature program to 1C, you need to add an EDS:
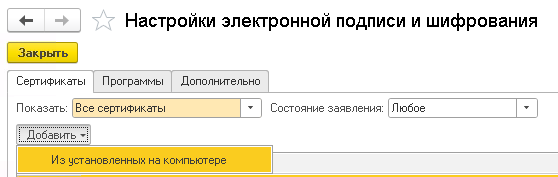
1) «Администрирование» → «Настройки ЭЦП» → section «Сертификаты»→ «Добавить». Select from the drop-down list«Из установленных на компьютере».
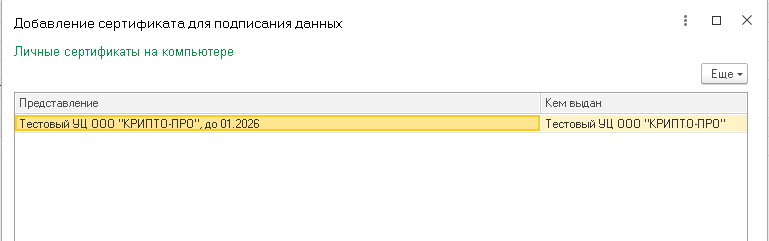
2) In the list of EDS available for adding, select the required certificate and click on it 2 times.
3) In the window«Добавление сертификата для подписания данных», if a password is set on the certificate, then enter it in the appropriate field.
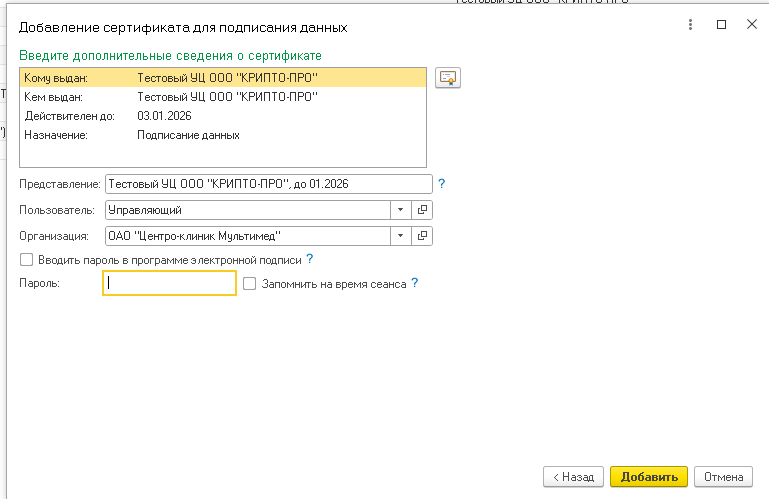
4) Press the button«Добавить»
5) After that, «Сертификаты»double-click the already added certificate in the section again.
6) Click on «Добавить»the signer button" you need to select a user who is linked to the doctor who will sign. The «Программа»cryptoprovider CryptoPro CSP (GOST 2012/256) must be specified in the field as shown in the figure below.
Step 10. Configure patient data
Video Tutorial
Why: To send documents to the EGISZ, you need correct patient data.
What to do when creating a new patient:
1) Fill in the patient's card:
- Full name (as in the passport)
- Date of birth
- SNILS (if available)
- Actual residential address
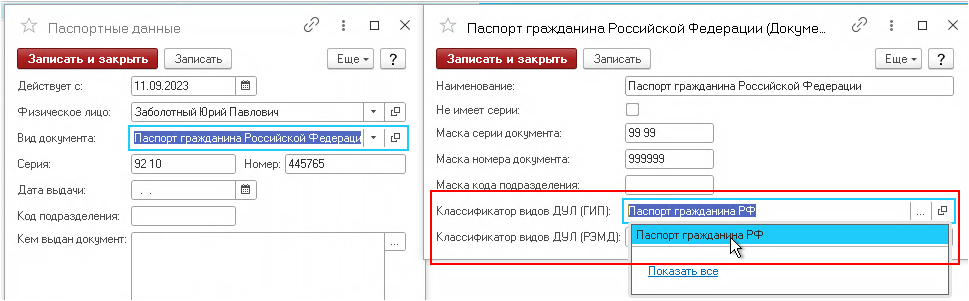
2) Specify the Identity document (passport, birth certificate):
- Select the Document Type.
- Match the selected document type with the version from the state classifier (click ... next to the Classifier of types of MUZZLE (HIP) and select the appropriate one, for example, "Passport of a citizen of the Russian Federation").
Step 11. Set up Medical Document Templates (EMDS)
Video Tutorial
Why: Templates are forms (protocols, conclusions) that are filled out by a doctor. To send them to the Unified State Register of Legal Entities, you need to link the fields of your 1C form with fields that the state system understands.
Important! In the program settings (Administration -> Regional settings -> Decimal separator) there should be a dot«.», not a comma). Otherwise, there will be errors when sending numbers: for example, the temperature is 36.6.
The basics:
- Imagine: Your template in 1C (for example, «Протокол приема терапевта») needs to be converted to a special «государственный»format (SAMD).
- For each type of document (consultation, research, etc.), the USISZ has its own list of required and optional fields.
Setting up a template for sending to the Unified State Register of Legal Entities:
1) Open the desired Reception Template via «Медицинская деятельность»→ «Шаблоны приёма».
2) Specify the name of the template (as you call this template yourself).
3) Select «Вид документа РЭМД»(EGISZ document type, for example, «Протокол консультации»).
We have prepared a detailed video tutorial on setting up the admission template
This instruction covers the basic steps. In difficult or unusual situations, do not hesitate to consult the documentation of your specific 1C version or the MedRoket support service.