


Content:
- Abbreviations used
- Checking the platform version
- Adding an electronic signature
- Filling in required parameters
- Filling in the Medflex settings
- Filling in the doctor's details
- To establish the compliance of the contractor
- Instructions for sending a document to RAMD
- Download the nomenclature from the website of the Ministry of Health
- Create an up-to-date SAMD
- Create a template for a medical document
- Generate a medical document
- Signing an organization
- Send a medical document to the RAMD
- The result of sending a medical document to the RAMD
Before enabling integration, the clinic must:
- Get a token for Public Services. Instructions for obtaining a token.
- Keep the token with you. It will be used when configuring integration.
1. Abbreviations used 
EGISZ is a unified state healthcare information System.
REMD is a registry of electronic medical documents.
MO is a medical organization.
FRMO is the Federal Register of Medical Organizations (EGISZ subsystem).
FRMR is the Federal Register of Medical Workers (EGISZ subsystem).
MIS is a medical information system.
EDS is an electronic digital signature.
The organization's OID is the identifier of the medical organization in the FRMO.
IPS — Integration subsystem
LPU uid is the identifier of the medical organization in the medical complex.
CMMD is a template for a medical document.
2. Checking the platform version
Before installing the extension, you need to check the current version of the platform. Currently, the compatibility mode of the extension is 8.3.12. The extension will not be installed on earlier versions of the platform.
The minimum configuration version that the extension was tested on is 3.0.15.14.
To work with EGISZ, you need a subsystem that is not available in earlier versions of the configuration.
The recommended minimum configuration version is 3.0.17.12. Starting from this version, the configuration interface has changed, and the instructions have been compiled taking into account the changes. Integration with older versions is possible, but the instructions may not match the outdated interface.
You can check the version by selecting → in the upper-right corner«Сервис и настройки»«О программе».
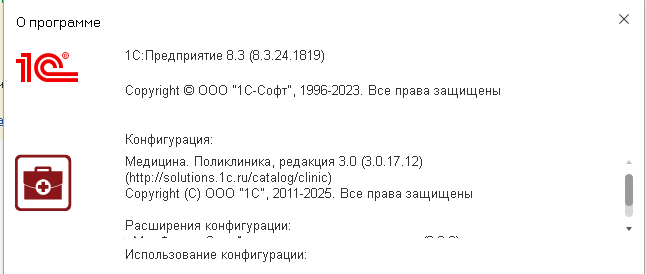
An error may occur when installing the Medflex extension on newer configuration versions (starting from 3.0.17.7)«Значение контролируемого свойства ОбъектРасширяемойКонфигурации у объекта ОбщийМодуль.ОчередьЗаданийСлужебный не совпадает со значением в расширяемой конфигурации». In this case, you need to click on the button on the right «Исправить»and select«Сохранить имя, изменив соответствие», and then apply the configuration changes.

3. Adding an electronic signature (EDS)
The EDS is installed on the computer where the signature is planned to be used.
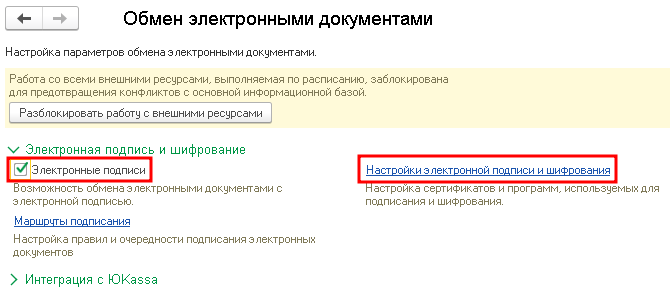
«Администрирование» → section «Настройка интеграции»→ «Обмен электронными документами».
You must set a flag «Электронные подписи»in the section«Электронная подпись и шифрование».
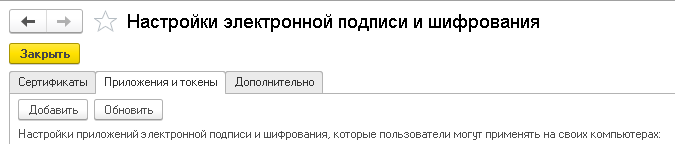
Then follow the hyperlink «Настройки электронной подписи и шифрования»in the same section.
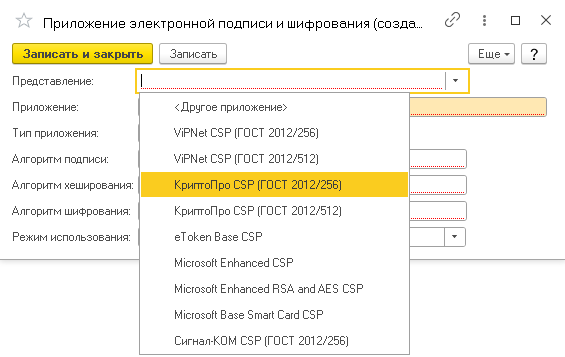
On «Приложения и токены»the Add CryptoPro encryption program tab: button «Добавить»→ in the window that appears«Представление», select "CryptoPro CSP (GOST 2012/256).
On «Сертификаты»the Add EDS tab: «Добавить»→ button«Для подписания и шифрования из личного хранилища».
Next, select the necessary one from the presented EDS and click on the button«Далее». If you have an EDS password, enter it. Finally, click the button«Добавить».
4. Filling in required parameters
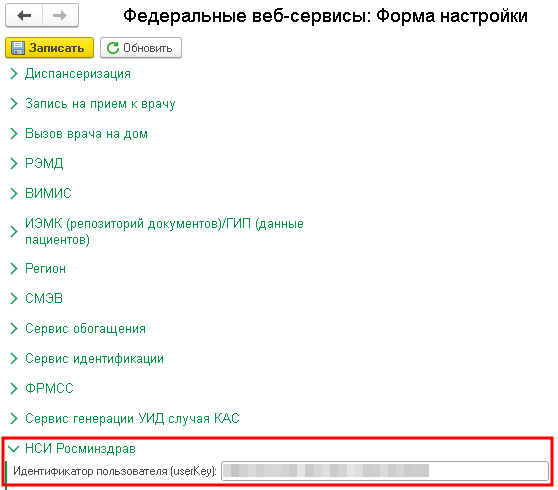
Fill in the user ID: «Администрирование» → «Федеральные веб-сервисы»→ → section «НСИ Росминздрав»→ «Идентификатор пользователя (userKey)»(The token received from Public Services at the beginning of the instruction is entered here).
Specify the organization's OID: «Справочники»→ section«Организационная структура» «Организации» ⮕ open the card of the required organization ⮕ drop - down list «Обмен с федеральными веб-сервисами»⮕ «Код OID Медицинской организации».
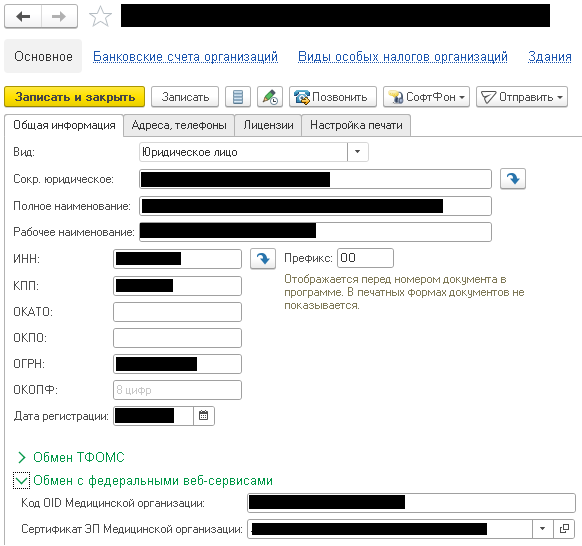
Select the Medical Organization's EP certificate in the next field.
5. Filling in the Medflex settings
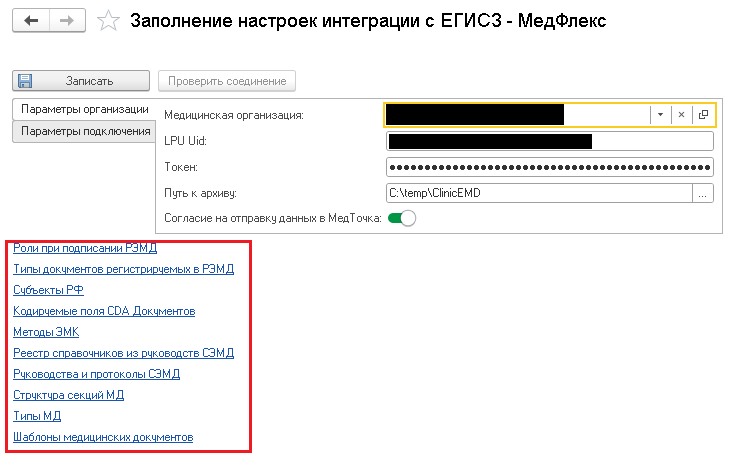
You can fill in the settings via processing: «Главное»→ in «Сервис»the → section«Заполнение настроек интеграции с ЕГИСЗ - МедФлекс».
- In the field«Медицинская организация», select your organization from the directory.
- Create a folder for storing the RAMD archive and specify it in the field«Путь к архиву».
- The LPU Uid and Token parameters are transmitted by Medflex specialists. When configuring them yourself, you need to request them.
- On «Параметры подключения»the set Medflex address tab: 10.235.0.1
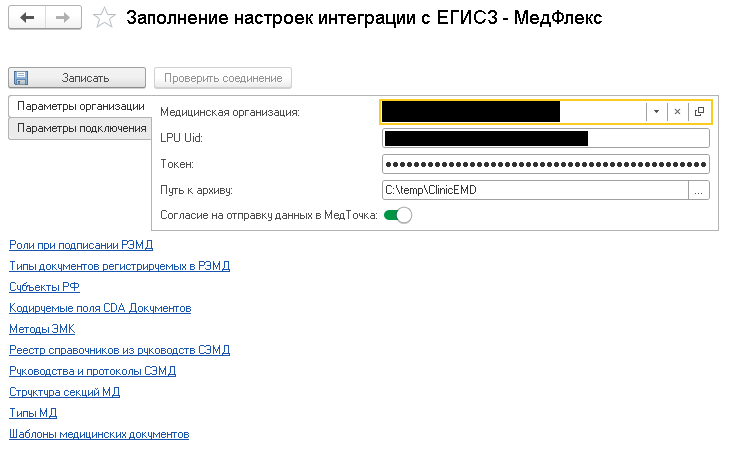
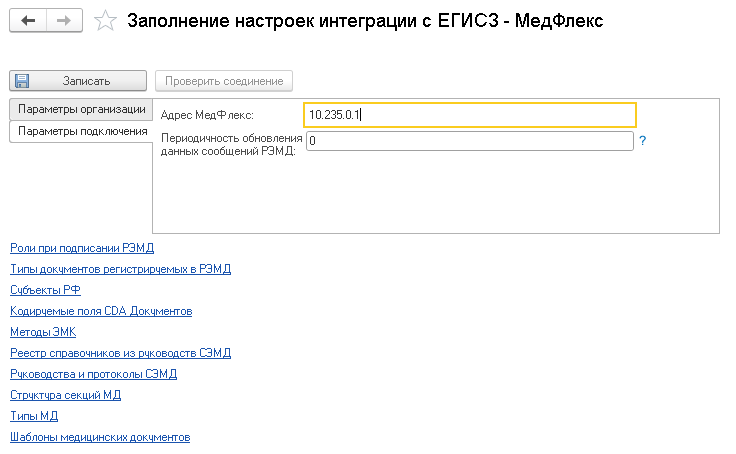
You can check the correctness of specifying the data on the button«Проверить соединение», it will be available after clicking on the button «Записать».
Then, using the hyperlinks indicated in the processing, download the reference books from the website of the Ministry of Health.
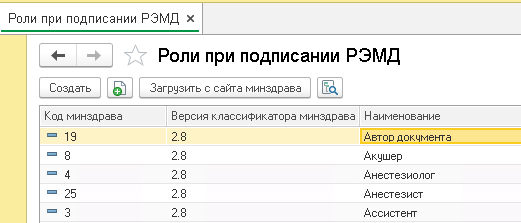
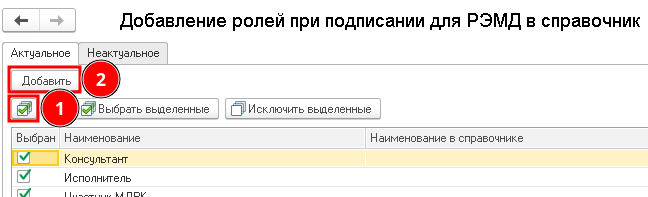
An example of downloading a reference «Роли при подписании РЭМД»book: Click «Загрузить с сайта Минздрава»→ select the current version and click «Загрузить версию»→ click «Выбрать все»→ next button «Добавить».
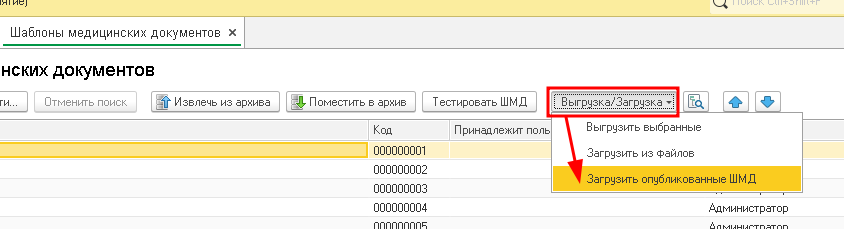
The download is slightly different«Шаблоны медицинских документов». To download, you need to expand the list «Выгрузка/Загрузка»and click on the button «Загрузить опубликованные ШМД».
6. Filling in the doctor's details
If the doctor participates in the exchange of documents with the RAMD, then his data must be filled in.:
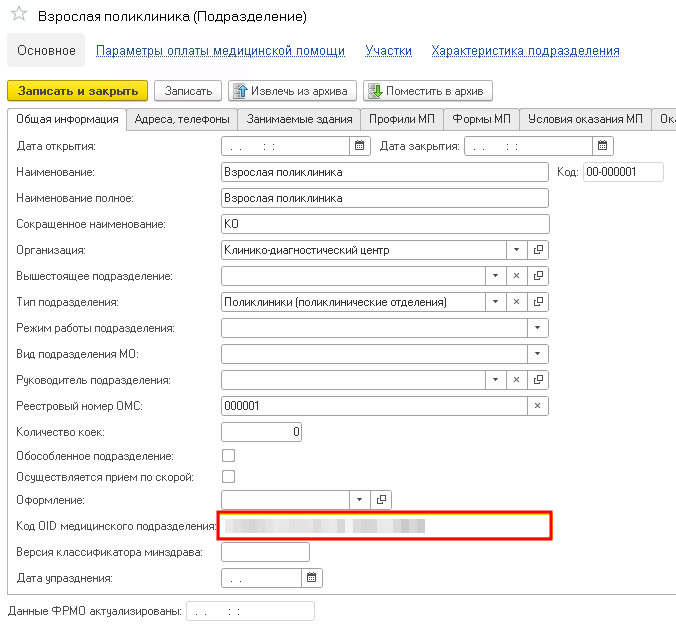
«Справочники» → «Медицинские рабочие места»→ required workplace → the field «Подразделение»must be filled in, and this department must have the following in its card«Код OID медицинского подразделения».
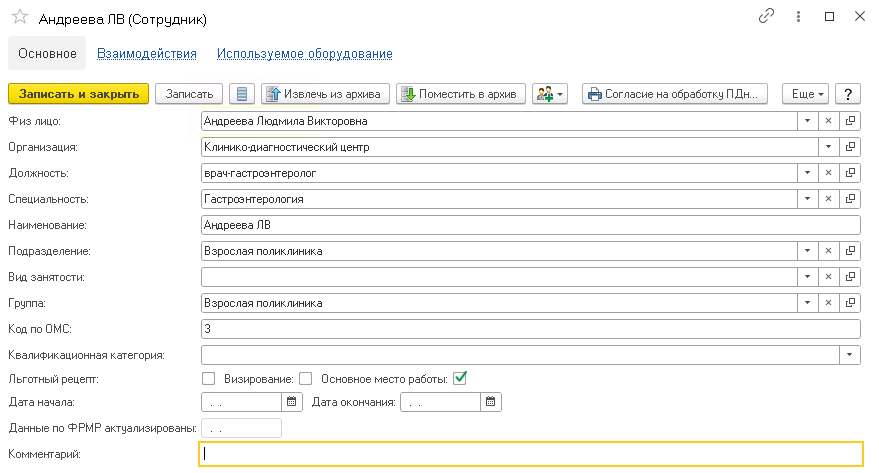
«Медицинская организация» → «Сотрудники»→ the data must be filled in:
- «Физ лицо» with the fields «ФИО», «Пол», «Дата рождения»and filled «Страховой № ПФР»in .
- «Организация» with the completed «Код OID Медицинской организации»form .
- «Должность» with the section parameters filled «Минздрав»in .
- «Специальность» with the fields filled «OID классификатора Минздрава»in and «Код Минздрава».
- «Подразделение» with the parameter filled «Код OID медицинского подразделения»in .
7. Establish the compliance of the contractor
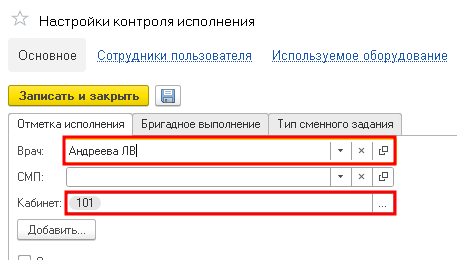
«Приемы пациентов» → «Настройки контроля исполнения»→ → tab «Отметка исполнения»→ «Врач»and «Кабинет»: both parameters must be filled in.
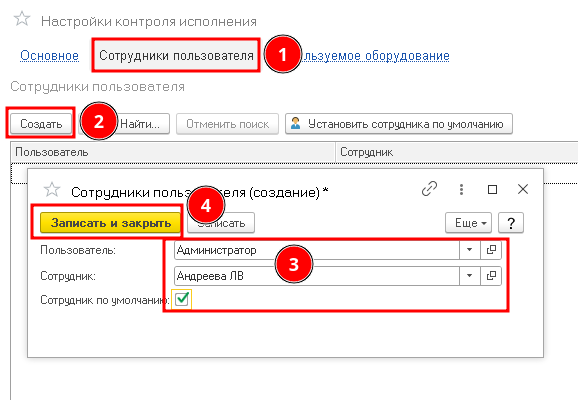
«Приемы пациентов» → «Настройки контроля исполнения»→ hyperlink «Сотрудники пользователя»→ button «Создать»→ select the user and the employee who corresponds to it, specify «Сотрудник по умолчанию».
Instructions for sending a document to RAMD
1. Download the nomenclature from the website of the Ministry of Health
To download the correct nomenclature from the website of the Ministry of Health using the example«Прием (осмотр, консультация) врача-гастроэнтеролога первичный»:
«Справочники» → section «Номенклатура»→ «Номенклатура» → the button «Загрузить с сайта Минздрава».
Set Values:
- Type of item = Medical service.
- Type of medical service = One-step implementation.
- Service provider = Doctor.
- The nature of the service = Visiting.
Press the button «Загрузить».

When you click on the group selector, you must select the services and click the add button.
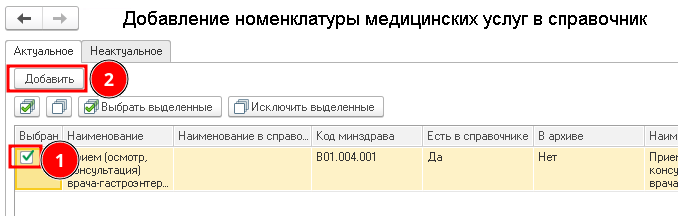
After downloading the item, you also need to configure the main specifications and set prices for it.
2. Create an up-to-date SAMD
«Справочники» → «Формы редактора ШМД»→ → button «Создать»→ «СЭМД»→ «Протокол консультации (ред. 5)».

Important! If, when trying to create an up-to-date version of the CMS, the user receives a message about unloaded classifiers, load the elements according to the name indicated in the message.

3. Create a template for a medical document
After the successful creation of the directory element«Формы редактора ШМД», it is necessary to create the directory element.«Шаблоны медицинских документов»:
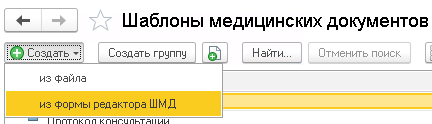
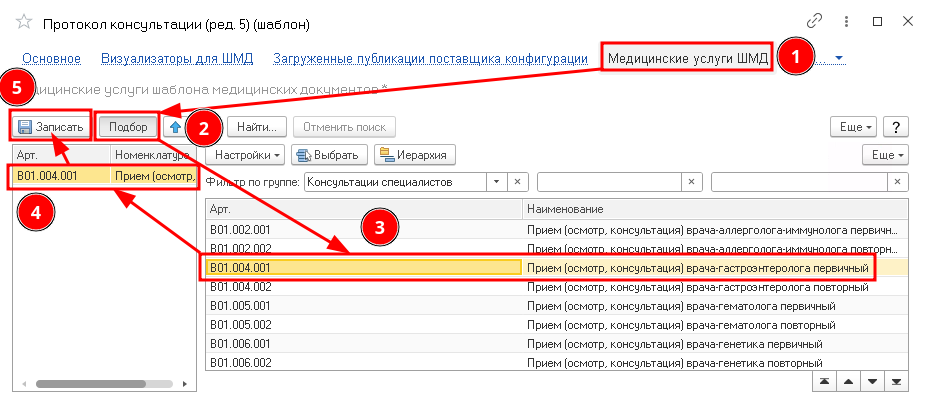
«Справочники» → «Шаблоны медицинских документов»→ → button «Создать»→ «из формы редактора ШМД» → select a previously created «Протокол консультации (ред. 5)»service → click on a hyperlink «Медицинские услуги ШМД»→ select a previously downloaded service «Прием (осмотр, консультация) врача-гастроэнтеролога первичный»→ button «Записать».
4. Create a medical document
«Приемы пациентов» → «Сменное задание»→ select a pre-formed appointment with the nomenclature that was previously downloaded from the website of the Ministry of Health.
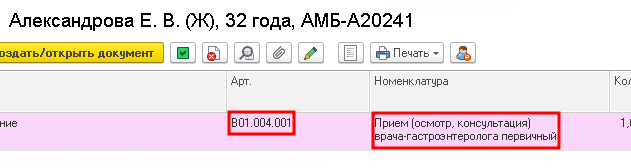
Button «Создать/открыть документ»→ select the current CMM → button «Выбрать».
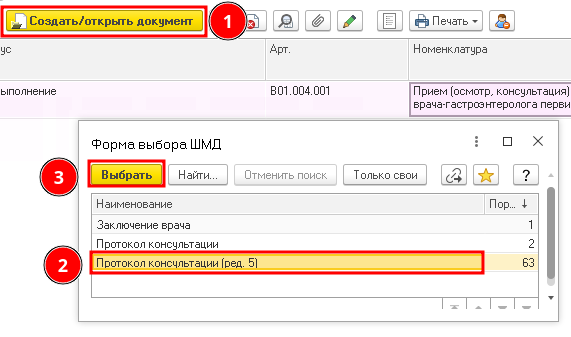
Fill in the required fields, if desired, you can add values to the rest.
Then click the button«Документ готов».
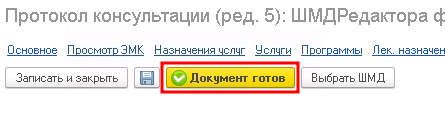
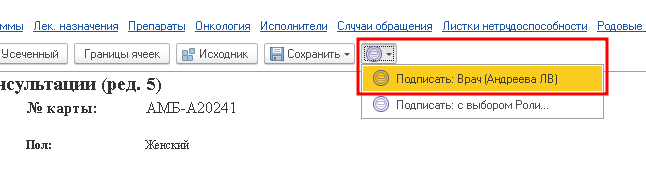
After processing the visualizer, a medical document will be viewed, where it can be checked for correctness and signed with the electronic signature of the doctor.
Before sending a medical document to the RAMD, the organization's signature must be affixed.
Signing an organization
The first option is In manual mode.
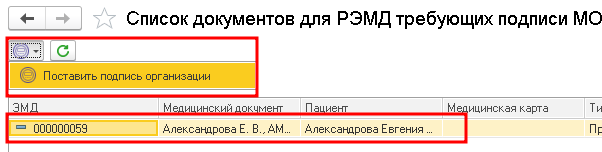
«Администрирование» ⮕ «Федеральные веб-сервисы»⮕ section «РЭМД»⮕ hyperlink «Подписание сертификатом МО медицинских документов отправляемых в РЭМД».
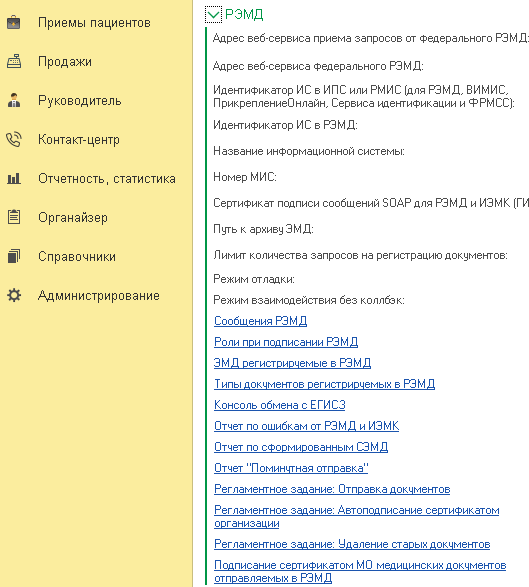
Select the required document in the list and put the signature of the organization by selecting it in the submenu«Подпись ЭППодменю».
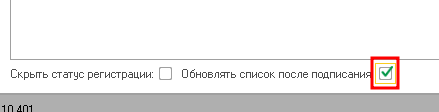
It is advisable to set the flag for automatically updating the list of documents when signing. It is located at the bottom of processing.
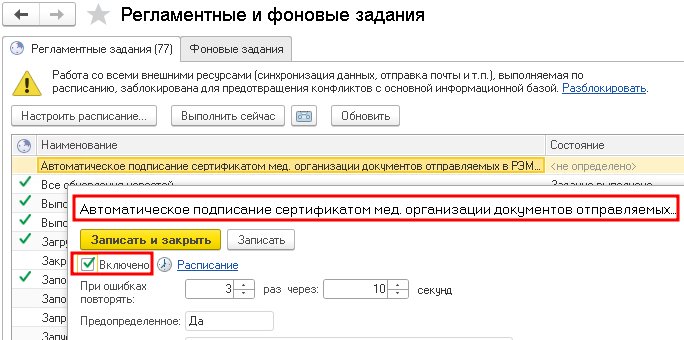
The second option is to set up or run a routine task.
Open «Функции для технического специалиста»→ find and open processing → section «Регламентные и фоновые задания»→ select and enable a task «Автоматическое подписание сертификатом мед. организации документов отправляемых в РЭМД».
5. Send a medical document to the RAMD
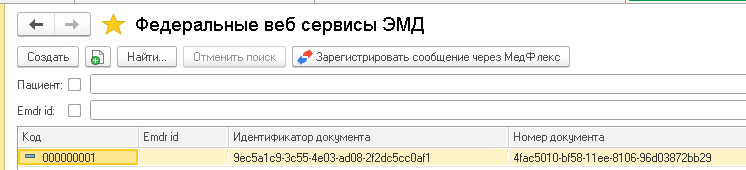
«Администрирование» → «Федеральные веб-сервисы»→ «РЭМД»→ «ЭМД регистрируемые в РЭМД»→ select the document to send and click on the button«Зарегистрировать сообщение через МедФлекс».
6. The result of sending a medical document to the RAMD
«Администрирование» ⮕ «Федеральные веб-сервисы» ⮕ «РЭМД» ⮕ «ЭМД регистрируемые в РЭМД»
Upon successful registration, the Emdr id column will be filled in, if errors occur during the process, they can be tracked.:
- If an error occurred during the validation stage of the Medflex proxy, the text will be written in the field«Текст последней ошибки».
- If an error occurred during the validation stage in the RAMD System, the response will be asynchronously recorded in the same field«Текст последней ошибки».
